Band Useage in ZL

Amateur Radio Band Usage From 160 metres to 10 metres
Compiled by Mark ZL3AB assisted by Gary ZL2IFB

Updated 31 Jan 2013

1800 to 1950 kHz – 160 metres (“topband” or “one-sixty”)
1800-1810 Digimodes
1810-1850 CW
1810 CW QRP
1836.6 WSPR beacons
1838 JT65A
1840-1843 Digimodes
1843-1950 SSB
1910 SSB QRP

3500 to 3900 kHz – 80 metres (“eighty” or “seventy five”)
3500-3525 CW DX Window simplex or split, listen for op’s instructions (no local ragchewing)!
3530 IOTA CW
3559 Hellschreiber (Region 3)
3560 QRP CW
3570 BPSK31
3575 Hellschreiber
3576 JT65A
3579 QRSS Beacons
3580 RTTY
3590 RTTY DX
3592.6 WSPR beacons
3600-3900 SSB
3620-3640 VK/ZL digimodes window
3710 QRP CW
3730-3740 SSTV (ITU Region 1)
3755 IOTA SSB
3776-3800 SSB DX window for intercontinental traffic
3791 ALE
3845 SSTV (ITU Region 2)
3885 AM

5060-5428kHz – 60 metres (“five megs”)
ZLs are not currently permitted to use 60 metres except for legitimate emergency communications purposes on either 5320 or 5395 kHz.

7000 to 7300 kHz – 40 metres (“forty”)
7000-7025 CW DX Window simplex or split, listen for op’s instructions (no local ragchewing)!
7030 IOTA CW
7030-7040 Hellschreiber
7035-7040 BPSK31 (ITU Regions 1 & 3)
7035-7045 RTTY (ITU Regions 1 & 3)
7039 JT65A
7039 Hellschreiber
7040 RTTY DX
7040 QRP (ITU Region 2)
70599 QRSS Beacons
7070-7075 BPSK31 (ITU Region 2)
7076 JT65A (USB)
7080 RTTY (ITURegion 2)
7083.6 WSPR beacons
7084 Hellschreiber (USB Region 1)
7075-7.100 SSB Calling Simplex or split listen for op’s instructions
7100-7.200 SSB (Region 1)
7125-7.300 SSB (Region 2)
7171 SSTV
7185.5 ALE
7285 QRP SSB
7290 AM

New Zealand is in ITU Region 3 but ZL amateurs are also allowed to use digimodes on the frequencies allocated to ITU Region 2 (the Americas).

10100 to 10150 kHz – 30 metres (“thirty”)
10100-10110 CW DX Window simplex or split listen for op’s instructions (no local ragchewing)!
10115 IOTA CW
10116 QRP CW
10135-10145 Hellschreiber
10138.7 WSPR beacons
10139 JT65A
10140 QRSS Beacons
10140 PSK
10140-10150 RTTY
10147 MFSK16

14000 to 14350 kHz – 20 metres (“twenty”)
14000-14025 CW DX Window simplex or split, listen for op’s instructions (no local ragchewing)!
14040 IOTA CW
14060 CW QRP
14070-14073 PSK
14071-14075 Hellschreiber
14073 Hellschreiber DX calling frequency
14076 JT65A
14078-14080 Throb
14078-14082 MFSK16
14080-14090 RTTY
14090-14110 Packet, AMTOR, PACTOR
14095.6 WSPR beacons
140989 QRSS Beacons
14101 ROS
14103 ROS
14107.5 Olivia 32/100
14100 NCDXF International beacon Network (Do not transmit here)
14109-14111 MT63
14115-14350 SSB (14170-14220 DX Calling Simplex or split listen for op’s instructions)
14227 SSTV
14230 SSTV
14233 SSTV
14236 SSTV
14260 IOTA SSB
14285 SSB QRP
14286 AM
14346 ALE

18068 to 18168 kHz – 17 metres (“seventeen”)
18070-18080 CW DX Window simplex or split listen for op’s instructions (no local ragchewing)!
18090 IOTA CW
18100 PSK
18102 JT65A
18104-18107 Hellschreiber
18104.6 WSPR beacons
18105 MFSK16
181089 QRSS Beacons
18110 NCDXF International Beacon Network (Do not transmit here)
18117.5 ALE
18128 IOTA SSB
18120-18168 SSB

21000 to 21450 kHz – 15 metres (“fifteen”)
21000-21025 CW DX Window simplex or split listen for op’s instructions(no local ragchewing)!
21040 IOTA CW
21060 QRP CW
21063-21070 Hellschreiber
21070-21080 PSK
21074 Hellschreiber
21076 JT65A
21080 MFSK16
21080 RTTY DX
21080-21110 RTTY
21094.6 WSPR beacons
21100-21450 SSB
21150 NCDXF International Beacon Network (Do not transmit here)
21340-21430 SSTV
21385 QRP SSB
21260 IOTA SSB
21432.5 ALE

24890 to 24990 kHz – 12 metres (“twelve”)
24890-24910 CW DX Window simplex or split listen for op’s instructions (no local ragchewing)
24917 JT65A
24920-24925 PSK
24920-24930 RTTY
24924 Hellschreiber
24924.6 WSPR beacons
24930 NCDXF International Beacon Network (Do not transmit here)
24932 ALE
24935-24990 SSB
24950 IOTA SSB calling frequency

28000 to 29700 kHz – 10 metres (“ten”)
28000-28025 CW DX Window simplex or split listen for op’s instructions (no local ragchewing)
28060 QRP CW
28063-28070 Hellschreiber
28074 Hellschreiber
28076 JT65A
28080 RTTY DX
28080-28110 RTTY
28120 PSK
28124.6 WSPR beacons
28160-28300 Beacons (Do not transmit here)
28200 NCDXF International Beacon Network (Do not transmit here)
28312.5 ALE
28321 QRSS beacons
28385 QRP SSB
28350-28700 SSB
28460 IOTA SSB
28560 IOTA SSB
28675-28685 SSTV
28885 Six metre liaison frequency
29000-29200 AM
29300-29510 Satellite downlinks (Do not transmit here)
29520-29580 FM repeater inputs (duplex, listen 100 kHz higher)
28590-28610 FM simplex
29600 FM simplex calling frequency
29620-29680 FM repeater outputs (duplex, transmit 100 kHz lower)

Notes
This list is not definitive.
Check your transmitting license for the explicit terms and conditions according to the New Zealand law.
All frequencies are dial settings in kiloHertz.
In order to prevent your transmissions extending out of band, do not transmit right at the band edges.
Keep your power, microphone gain and speech processing down to reduce spurious transmissions and overmodulation, especially on digimodes.
Stay clear of the beacon and satellite downlink frequencies to avoid interfering with reception of very weak signals.
On SSB, use LSB on 40m and lower frequency bands, or USB on 20m and up.
Most digimodes use USB on all bands. If you cannot decode a good signal, try LSB or ‘invert’, assuming you are using the appropriate digimode and speed!
Some of the frequencies shown are not available to amateurs in other countries, who may therefore be found elsewhere. In particular, novices often have restrictions on the bands, frequency-ranges and transmit power.
CW is permitted across the entirety of each band, but is usually found in the segments indicated.
DXpeditions and rare DX stations usually operate “split” (half-duplex): listen to the DX operator’s instructions or tune around to find other callers. Avoid calling on the DX station’s transmit frequency (simplex) unless you are sure he is taking callers there.
All frequencies except band edges are approximate. Always listen carefully for a clear frequency before transmitting (including when operating split).
The 30m, 17m and 12m bands have been known as “the WARC bands” since they were initially allocated at a World Amateur Radio Conference.
Some bands (such as 80 & 30 metres) are shared with other radio services: do not interfere with them. They may have primary rights.
Please report pirates and intruders to the IARU Monitoring Service (see http://www.nzart.org.nz/nzart/monitoring-service/)

Operating modes
Morse code: CW
Voice modes: SSB, FM, AM and digital speech
Digimodes: JT65A, MT63, PSK, MFSK, Throb, RTTY, Packet, AMTOR, PACTOR, Clover, OLIVIA, DominoEX, ALE, CMSK, Piccolo and others
Raster-scanning modes: Hellschreiber, SSTV
ALE (in USB mode): MIL-STD 188-141 ; FED-1045 (8FSK – 2kHz Bandwidth)

Glossary
AM Amplitude Modulation
AMTOR Amateur Telex Over Radio
CMSK Correlated, Convolved, Chat-mode MSK (see http://www.qsl.net/zl1bpu/CMSK/cmsk.htm)
CW Continuous Wave
Digimodes Digital data modes
Duplex Transmit on one frequency while simultaneously receiving on another
FM Frequency Modulation
Half-duplex, split Transmit on one frequency, then receive on another
IOTA Islands On The Air
ITU International Telecommunications Union
LSB Lower Sideband
MSK Multi-Shift Keying
NCDXF Northern California DX Foundation (see http://www.ncdxf.org/pages/beacons.html)
Packet Packet radio (TCP/IP)
PACTOR Packet Telex Over Radio (100 baud increasing to 200 baud on good links)
PSK Phase Shift Keying (mostly 31 baud i.e. PSK31, with some activity on PSK63, PSK125 and occasionally other variants)
QRP Low transmit power (up to 5 watts output)
QRSS Very slow speed CW (takes seconds to send each element)
RTTY Radio Teletype (usually 170 Hz shift and 50 baud, sometimes 75 baud)
Simplex Transmit and receive on the same frequency
SSB Single Sideband
SSTV Slow-scan Television
USB Upper Sideband
WSPR Weak Signal Propagation Reporter beacon use MEPT_JT mode, similar to JT65A (see http://WSPRnet.org)

QSLing For Maximum Returns

This began as an answer to a question raised at a local club meeting where I was giving a talk on QSLing successes and pitfalls. This was my answer to Peter.

Ah yes… the most frustrating endeavor in ham radio except listening to your local repeater!
Peter there are some do’s and don’ts to weight things in your favour. Let’s start with the basics of QSLing.

Date and time
The DATE and TIME are ALWAYS written in Universal Coordinated Time. Be sure you enter the date correctly. There are many valid date formats: October 9 1996 , Oct.9.1996, 9-10-1996, 09-10-96, 09/10/96 but for QSLing purposes the time, like the date, is ALWAYS written in UTC time, and starts at the same time as the new UTC day and is expressed as 0000z. NEVER enter your local time. To do so is courting a no reply, and a waste of time and effort. The BAND can be entered as meter band (20m), as frequency band (14 MHz), or as your transmit frequency (14.195).

The Posting Process:
The size of the envelope is important because of what will be placed inside it. DO NOT use the small airmail envelopes available in many supermarkets as you could well find the returned card has been folded over in order to fit inside. Besides your QSL card, you may wish to include a postcard of your area to show where you reside. I suggest you use a size C6 which is 115x162mm. A packet of 100 is reasonably priced and is available from supermarkets, stationers, and Post offices. Airmail stickers are freely available and should you use an airmail rubber stamp only use a blue ink pad. The mail sorter is glancing for a blue mark, not a red one and instinctively places the blue marked one in the airmail direction. There are two stickers available in the NZ Post Office. Use the Green ones as they are economy, get there almost as fast by air mail and cost $1.50 to send anywhere in the world.

The Package you send
PRINT the address neatly on the envelope. NEVER, NEVER put a call sign on the envelope ANYWHERE. Should you not know the name of the operator, write ‘The Manager’, Box xyz etc. Next, on another envelope neatly print your own address, being sure to include New Zealand at the end. Fold this envelope neatly in half and insert into the one addressed to the DX /manager being sure to place the folded section in first, so that, when it is opened at the other end with a knife or similar tool, the enclosed envelope is also not slit in half. It is essential that you enclose in your letter a form of finance to enable the DX station/manager to purchase a local postage stamp to return your confirmation QSL card. This can take the form of an International Reply Coupon, available from NZ Post and is the equivalent to the minimum airmail letter rate. One IRC is sufficient for letters from North America and Japan but from Europe two or three will be required.

A second alternative is to purchase US$1.00 notes from your local bank. Two US$ are the norm for most of the world and two or three US$ are required for some European counties. For Japan one IRC will cover the return postage. A third method is to put the correct value of mint postage stamps of that country on the envelope, if your local stamp dealer has some among his stock. If you are sending your letter to a developed country, a normal rate postage stamp is ok. However if it is going say, to a third world area you can ask the post office for a printed label stamp for the value required. This is less attractive than a conventional postage stamp and will reduce the likelihood of your letter going astray. The attaching of one of the small green customs declaration stickers filled in as ‘used card’ and ‘ncv’ (no commercial value) will add an air of security to your letter, reducing the risk of it disappearing.

So now you have done everything correctly and you expect to get one by return right? Wrong! It never happens 100% of the time. My estimated percentages over the years and about 15,000 outgoing cards are as follows:

1) QSL Buro – You will be lucky if you get 30% return. Less if they are contest QSOs

2)QSL Manager – Very good returns if the guy is well known as his ham “reputation” depends upon it! I get about 80% returns across a wide range of managers.

3)Direct – This is where it gets a bit tricky but generally I get above 50% returns. If it’s a well known Dxer you will almost always get great returns as his “reputation” is important. If he is an unknown the returns are usually lower.

4)Green stamps or IRCs – Be careful. Some countries won’t allow green stamps. Some country’s Post office employees will steal them. With the advent of PayPal and OQRS, IRCs will be phased out. Some countries will end issuing IRCs at the end of 2013. Some countries are not signatories to the International Postal Union and don’t know what IRC’s are. Some countries will look at your stamp if it’s a nice one and your envelope will disappear!

Rogue DXers
Ham radio is filled with a cross section of DXers and DX stations. Some if extremely rare will actually ignore your first QSL direct and wait for you to send another one (with more green stamps of course) Some will ignore you completely! I can recall working a rare middle east station about 10 years ago and could not get him to QSL. One day I actually heard him in QSO with another very prominent middle east station and I waited till they were finished and called him. I had worked him a few times before and asked him if he could ask his mate to have a look for my QSL!! Yes, I know, cheeky as hell but anything is fair when you want a QSL. The guy said he would and I had my QSL in about 3 weeks after waiting over 4 years.

Sometimes rogue DXers will take your money and return your QSL via the buro. I used to go berserk when I got one and then I thought… calm down….. I have the card and it counts so what’s your problem. And then there are the DXers that sit there night after night making the QSO numbers and then wait for the cash to arrive. And it does! They have a moral dilemma whether to order their new BMW or fork out for return cards and postage.

And there are the funny ones. A close mate worked a well known Middle East station a few years ago a few times on different bands. He particularly wanted the 80M confirmation and it never came after several tries. I worked the same station on several bands and have QSLs from the same guy no problem. How do you figure that one? So every time I mention that particular station in my mate’s presence I get an earful.

With QSLing Peter there is no definitive answer. You just do what you have to do and follow the guidelines above. And don’t take a non-return for an answer. Many years ago I worked 6Y5WJ on CW. After sending him a card via buro and green stamp version direct nothing eventuated. I have never worked another 6Y5 on CW. A few months ago I saw him spotted on the DX cluster. Ah Ha!!!! I then went to QRZ.com and got his email address and sent him the usual groveling note. Surprisingly he wrote straight back and said he had moved back and forth from 6Y5 to G land and the mail never got to him and if I sent him a card.. he would QSL. And sure enough he did and it gave me #305 on CW.

So… never give up and you will get there. Just don’t expect others on the other side of the world to have the same morality as you do!

73, Lee ZL2AL

(See what happens when you ask a question?

Design & Print Your Own QSLs

Love the DXing. Hate the QSLing! 

Most of us treat QSLing as a necessary evil when looking for awards. Even casual operating will result in a flood of QSLs arriving at the bureau. The problem is that QSLing becomes very expensive if you do a lot of operating. It’s not just the horrendous cost of postage, but the cost of having them professionally printed has risen considerably over the past few years. The ARRL’s “Logbook of the World” (LoW) becoming active has reduced costs enormously. The Internet e-QSL system works well but is not acceptable for most of the top awards. Writing individual QSLs by hand is time consuming and laborious in the extreme. There is a better way!

Electronic Log books such as DXLog, WriteLog, DX4Win and others have the facility to print labels. The programs can be adjusted to print any number of labels per page or one label per page and in fact print directly onto the QSL card. Most inkjet printers and laserjet printers will accept and print 90mm x 140mm cards fed into the printer end on as long as the card used is not too thick. Standard QSL stock is 225 grams. Small printers will have a problem with the 225 gram thickness but will process the thinner 140 gram stock quite nicely.

Ten years ago graphics programs were the domain of the professional printing houses. Now you can buy Corel Draw 7.0 or Microsoft Publisher 2000 and other graphics programs relatively cheaply to design your own QSL cards. In fact you can now have complete control over the design, manufacture and processing of your own cards. The ZL2AS QSL card below is a simple one I designed for handwritten information.ZL2AS LH

There are specific QSL design programs available. They did not suit what I wanted to do as most of them had quite a few formats but wouldn’t allow me to have the “blank space” where I wanted it. Their designs where based on filling out a QSL with pen and ink. I don’t do pen and ink these days! Have a look at these websites below.

http://hamradiosoftware.com/HAM/qsldes.html or
http://www.rsars.org.uk/QSLDIY.HTM or
http://www.df3cb.com/bv/bvfeatures.html or
http://www.sm7tog.com/download.html (for icons)

I use Microsoft Publisher working with Windows XP to design the QSL. You could also use MS Word although the Microsoft way of doing graphics in Word is a bit unusual and unwieldy. You don’t have to be a graphics designer because QSL cards are not difficult to lay out and you may have thousands of examples in your collection that you can mine for ideas. If you don’t feel confident in designing it yourself, there are lots people around who dabble in Photoshop and other graphics programs and can do it easily. It is a simple matter to pirate the best of the designs and adapt them your needs. The text boxes and various elements of your design are easily moved around the screen.

As you do the design on your card the Microsoft Publisher program will set up four identical QSLs on an A4 page. Other graphics programs will handle it in a different way. You will notice in the ZM4T QSL below that the centre area is left clear for the program to print the QSO information from the logging program. The key is deciding where to put your reference point on the card. My reference point all my designs is 3mm to the right of the G in the word “Confirming” and level with the word. (See the ZM4T) QSL below. Once you have that point then you can set the label parameters in DX4Win Print|Edit window. The cards go into the tray end on side to print UP and the Logo/Name on the right side of the card first.ZM4T_QSL_764When your design is completed it is a simple matter to print off a few A4 pages, cut them into QSLs with scissors and check the Logging Program registration of the printing of the QSO information on your printer. Because I do a lot of QSLing, I have invested in a good quality guillotine and it’s now very easy to chop up a few hundred QSLs from the A4 pages by setting the dimensions to standard QSL size of  90mm x 140mm.

See the ZL2AJ design below. When the four QSL template page is finalized, go into any good stationery supplier and ask for Kaskad A4, 140 gram paper in packs of 250 with your choice of colour. 140Gm is perfect as it will go through most inkjet and laserjet printers if you want to print them yourself. All colours of the rainbow are available. Or you can head off to your local photocopy house to have them photocopied and cut exactly to size. 250 sheets will make 1000 QSL cards.ZL2AJ QSL4

The cost varies from 4 to 8 cents per sheet for first class laser copying. I am sure that a better price could be found by shopping around. The cost of cutting to size is about $5.00 per pack of 250 sheets. The cost of the Kaskad sheets is around $25.00 per 250 sheets. The total cost works out to around $40 – $75 per 1000 QSLs depending on how much of the process you do yourself. You could even print your QSLs on plain A4 white paper. The cost would be around $7.00 for 2000 QSLs. They would be thin but would satisfy the requirements for a QSL.

I have used DX4Win Logging program since the early 1990s and am up to version 8.05 It gives me full control of where the information prints on the card and mine is set up to print up to 5 QSOs per card

The finished ZM4T QSL with the QSO information is shown above. I use white card and print it on my cheap Brother printer. You will note that the DX4WIN logging program fills in the QSO information in the correct place on the card. This card shows four QSOs for XR0X and the logging program also inserts a few lines at the bottom with the equipment info, the operator’s name and PSE or TNX QSL determined by the program. All the information is on one side of the card which makes life easier for QSL managers.

The ZL2AL QSL design below shows the front side graphics and the second is the back of the QSL. It was been printed commercially by UX5UO Print with a cartoon on the front ready for printing QSO information on the back. That same reference point is used for print registration. The cost saving of not having to purchase about 20,000 labels was considerable. I started out using a cheap Inkjet printer but soon found that a cheap Canon black and white only laser printer with a toner cartridge was much more economical to run as the printing on the back of the card was minimal.

The front side of the UX5UO printed card. The cartoon graphic was created by a company in the USA to add a little humour to sometimes humourless QSLs.

The front side of the UX5UO printed card. The cartoon graphic was created by a company in the USA to add a little humour to sometimes humourless QSLs.

Latest ZL2AL design using a very old MS Publisher graphics program. This is the back of the card. Front is not shown.

Latest ZL2AL design using a very old MS Publisher graphics program. This is the back of the card. Front is  shown above.

n

The ZL7T Design is shown below. We made about 3,000 of them.

The ZL7T design works very well and is printed with an Inkjet and QSL info with the Canon Laserjet.

The ZL7T design works very well and is printed with an Inkjet and QSL info with the Canon Laserjet.

You could even print directly from your printer and cut the QSLs yourself if you only want small runs and want to reduce the cost even further. The cost of a printer ink cartridge must be taken into consideration. Cartridges are expensive buying from your local NZ supplier. I used an old Brother 130C multi function printer for a few years but it was expensive to run. I discovered that I can order 4 sets of cartridges (made in China and I will happily void warranty!!!) for $70 NZD delivered purchased on eBay.

I have a specifically dedicated Canon BP3120 Laser B/W only printer that I use for feeding the 90 x 140mm cards end ways from the bottom tray to print the black ink QSO information on. I can print thousands of QSL cards with one cartridge. A new printer is cheap at around $70 or so. I also use a QSL Manager program called Hamcall by Buckmaster which can be set up to print directly onto C6 size envelopes. The Hamcall CD is a database of 1.3 million names and callsigns. Addresses and call letters are updated monthly from their website. After I have printed ten or fifteen “QSL Direct” cards, I can call up the names and addresses from the Hamcall CD and print the envelopes. I also use Hamcall to print my own “return” C6 envelopes with my name on them. No labels are involved – Ever!

I also have a small sheet of paper about the size of the QSL card to enclose with the QSL which tells the other recipient a little about myself, my family and the area I live in. I am quite amazed at the number of letters I get in response to the info sheet telling me about their history and their families. It’s much more interesting when you know a little more about who you were talking to other than just name, rank and serial number! Typically I can receive 50 cards or more from the QSL bureau and process them in 15 or 20 minutes. And yes, there is a place on the card where I sign each one individually.

The system works very well for me and saves a lot of time, effort and money in the process of producing QSL cards. Please contact me at [email protected] if you don’t feel comfortable with designing a card. I would be happy to help set up a template for you and then you can simply have it copied for inexpensive QSLing.

73 de Lee ZL2AL

Gus Browning – W4BPD

Gus Browning ~ W4BPD
W4BPDThe first DXer elected to the Dx Hall of Fame was Gus M. Browning, one of the greatest of the DXpedition operators, who received this honour in 1967. Gus, a former Midwestern TV technician, was one of those DXers who would go anywhere to start a pile up, as long as he had a good supply of Coca-Cola! Gus operated from over 100 countries and many times one could not find the place on any map. He also came up with some very strange call signs.

To listen to Gus operating was to listen at the feet of a master of DX operating. I shall always remember him saying; “Ok, ok, ok chaps, all stations up ten, up ten – all stations up ten!” The heavy metal brigade moved up ten and called long and loud and I heard Gus mutter; ”That will take care of the lids!” and he proceeded to pick off stations at 4-5 a minute – anywhere except ten up. Work it out! I was trying to work Gus, but I collapsed in laughter as soon as I worked it out. Yes, he had a great sense of humor. Also remember the time he told us: “I have to QRT now and get back in the boat – my feet are getting wet!”

Gus never seemed to get upset during the pileups and always kept cool. I never heard him get ruffled or cross – always even-tempered, smooth, and efficient but controlled the pile up. He was also a good technician and was able to make repairs to his equipment at remote locations. He also taught himself to write with his left hand so he could operate two-handed on CW.

Although I only met this very fine Gentleman tête-à-tête once; we had several contacts on the air and did correspond by letters for many years. In his spare time, Gus was editor of The Dxers Magazine.

Gus passed away on August 21, 1990 at the age of 82. He will remain in my memory as a great pile up technician.

Dick Spenceley KV4AA

KV4AAIf you don’t have a QSL from the U.S. Virgin Islands, it’s not Dick’s fault. He was providing QSOs from there for 55 years (1927-1982). Dick was born in West Newton, MA, in 1905, and lived here until 1924 when he joined the U.S. Navy. In 1925 he transferred to Navy Radio Station NBB in St. Thomas, U. S. Virgin Islands. Dick developed an interest in amateur radio, and in 1927 he became licensed as K4AAN. At that time, the K4 prefix was used for stations in Puerto Rico and the U.S. Virgin Islands.

Dick caught the DX contest bug in 1932, when he took part in the week-long ARRL DX CW Contest, placing third. The experience gained by frequent participations in subsequent contests enabled KV4AA to make the world’s top score in the ARRL DX CW Contest of 1951, 1954 and 1956. In addition to contesting, Dick became a serious DX operator after receiving his KV4AA call sign in 1947, and in 1962 he held the top spot on the DXCC Honor Roll. After reaching that pinnacle, he continued to work DX, but did not submit any further QSLs to maintain a ranking.

He served as Dx Editor of CQ from 1952 to 1958 and fashioned the popular WPX awards during the later part of his stint with the magazine. Dick also played an important role in creating the YASME Dxpedition of the intrepid Danny Weil – VP2VB/MM, who activated 32 rare DX spots while attempting to sail around the world single-handed.

KV4AA was inducted into the CQ DX Hall of Fame in March, 1969. Dick became a Silent Key in 1982.

The G5RV Antenna

THE G5RV ANTENNA, with its special feeder arrangement, is a multiband centre-fed antenna capable of very efficient operation on all hf bands from 3.5 to 28mhz, specifically designed with dimensions which allow it to be installed in gardens which accommodate a reasonably-straight run of about 102ft (31.1m) for the “flat-top”. However, because the most useful radiation from a horizontal or inverted-V resonant antenna takes place from the center two-thirds of its total length, up to one-sixth of this total length at each end of the antenna may be dropped vertically, semi-vertically, or bent at some convenient angle to the main body of the antenna without significant loss of effective radiation efficiency. For installation in a very limited space, the dimensions of both the “flat-top” and the matching section can be divided be a factor of two to make the half-size G5RV, which is a very efficient antenna from 7 to 28 mhz.

The full-size G5RV will also function on 1.8mhz band if the station end of the feeder (either balanced or coaxial-type) is strapped and fed by a suitable antenna tuner using a good earth connection or a counterpoise wire. Similarly, the half-size version may be used thus on 3.5 and 1.8 mhz bands.

In contradistinction to multiband antennas in general, the full size G5RV antenna was not designed as a half-wave dipole on the lowest frequency of operation, but as a 1 1/2 wave centre-fed long-wire antenna on 14mhz, where the 34ft (10.36m) open-wire matching section functions as a 1:1 impedance transformer, enabling the 75ohm twinlead or 50/80ohm coaxial cable feeder to “see” a close impedance match on that band with a consequently low vswr on the feeder. However,on all the other hf bands the function of this section is to act as a ” make-up” section to accommodate that part of the standing-wave (current and voltage components) which, on certain of the operating frequencies, cannot be completely accommodated on the “flat-top” (or inverted-V)radiation portion. The design centre frequency for the full-size version is 14,150khz, and the dimensions of 102ft (31.1m) is derived from the formula for long-wire antennas which is:G5RV1

where n= number of half-wavelengths of the wire (flat-top).

In practice, since the whole system will be brought to resonance by the use of an antenna tuner, the antenna is cut to 102ft (31.1m).

As it does not make use of traps or ferrite beads, the “dipole” portion becomes progressively longer in electrical length with increasing frequency.This effect confer certain advantages over a trap or ferrite-bead loaded dipole because, with increasing electrical length, the major lobes of the vertical component of the polar diagram tend to be lowered as the operating frequency is increased. Thus, from 14mhz up, most of the energy radiated in the vertical plane is at angles suitable for dx working. Furthermore, the polar diagram changes with increasing frequency from a typical half-wave dipole pattern at 3.5mhz and a 2 1/2 wave in-phase pattern at 7 and 10mhz to that of a “long-wire” antenna at 14, 18, 21, 24 and 28mhz.
Figure 1.

Although the impedance match for 75 ohm twinlead or 80 ohm coaxial cable at the base of the matching-section is very good at 14mhz, and even the use of 50 ohm coax cable results in only about 1.8:1 vswr on this band, the use of a suitable antenna tuner is necessary on all the other hf bands because, on those bands, the antenna plus the matching-section will present a reactive load to the feeder. thus the use of the correct type of antenna tuner (unbalanced input to balanced output if twin-wire feeder is used, or unbalanced to unbalanced if coaxial feeder is used) is essential in order to ensure the maximum transfer of power to the antenna from a typical transceiver having a 50 ohm coaxial (unbalanced) output. Also to satisfy the stringent load conditions demanded by such modern equipment employing an alc system which “senses” the vswr condition presented to the solidstate transmitter output stage so as to protect it from damage which could be caused by a reactive load having a vswr of more than about 2:1.

Figure 2
The above reasoning does not apply to the use of the fullsize G5RV antenna on 1.8mhz, or to the use of the half-size version on 3.5 and 1.8mhz. In these cases the station end of the feeder conductors should be “strapped” and the system tuned to resonance by a suitable series-connected inductance and capacitance circuit connected to a good earth or counterpoise wire. Alternately, an “unbalanced-to-unbalanced” type of antenna tuner such as a “T” or “L” matching circuit can be used. Under these conditions the “flat-top” (or inverted-V) portion of the antenna plus the matching section and feeder function as a “Marconi” or “T” antenna, with most of the effective radiation taking place from the vertical, or near vertical, portion of the system; the “flat-top” acting as a top-capacitance loading element. However, with the system fed as described above, very effective radiation on these two bands is obtainable even when the “flat-top” is as low as 25ft (7.6m) above ground.

Theory of Operation
The general theory of operation has been explained above; the detailed theory of operation on each band from 3.5 to 28mhz follows, aided by figures showing the current standing wave conditions on the “flat-top” and the matching (or make-up) section. The relevant theorical horizontal plane polar diagrams for each band may be found in any specialized antenna handbooks. However, it must be borne in mind that: (a) the polar diagrams generally shown in two dimensional form are, in fact, three dimensional (ie solid) figures around the plane of the antenna; and (b) all theoretical polar diagrams are modified by reflection and absorption effects of near-by conducting objects such as wire fences, metal house guttering, overhead electric power and telephone wires, house electric wiring system, house plumbing systems, metal masts and guy wires, and large trees. Also the local earth conductivity will materially affect the actual polar radiation pattern produced by an antenna. Theoretical polar diagrams are based on the assumptions that an antenna is supported in “free space” above a perfectly conducting ground. Such conditions are obviously impossible of attainment in the case of typical amateur installations. What this means in practice is that the reader should not be surprised if any particular antenna in a typical amateur location produces contacts in directions where a null is indicated in the theoretical polar diagram and perhaps not such effective radiation in the directions of the major lobes as theory would indicate.
Figure 3G5RV2
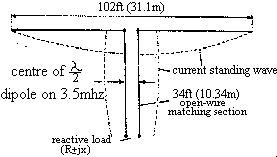
3.5Mhz. On this band each half of the “flat-top” plus about 17ft (5.18m) of each leg on the matching-section forms a fore-shortened or slightly folded up half-wave dipole. The remainder of the matching-section acts as an unwanted but unavoidable reactance between the electrical centre of the dipole and the feeder to the antenna tuner. The polar diagram is effectively that of a half-wave antenna. See figure 1.

7Mhz. The “flat-top” plus 16ft (4.87m) of the matching section now functions as a partially-folded-up “two half-wave in phase” antenna producing a polar diagram with a somewhat sharper lobe pattern than a half-wave dipole due to its colinear characteristics. Again, the matching to a 75 ohm twinlead or 50/80 ohm coaxial feeder at the base of the matching section is degraded somewhat by the unwanted reactance of the lower half of the matching section but, despite this, by using a suitable antenna tuner the system loads well and radiates very effectively on this band. See figure 2.

10Mhz. On this band the antenna functions as a two half-wave in-phase colinear array, producing a polar diagram virtually the same as on 7mhz. A reactive load is presented to the feeder at the base of the matching section but, as for 7mhz, the performance is very effective. See figure 3.

14Mhz. At this frequency the conditions are ideal. The “flat-top” forms a three-half-wave long centre-fed antenna which produces a multi-lobe polar diagram with most of its radiated energy in the vertical plane at an angle of about 14 degrees, which is very effective for dx working. Since the radiation resistance at the centre of a three-half-wave long-wire antenna supported at a height of half-wave above ground of average conductivity is about 90 ohm, and the 34ft (10.36m) matching section now functions as a 1:1 impedance transformer, a feeder of anything between 75 and 80 ohm characteristic impedance will “see” a non-reactive (ie resistive) load of about this value at the base of the matching section, so that the vswr on the feeder will be very nearly 1:1. Even the use of 50 ohm coaxial feeder will result in a vswr of only about 1.8:1. It is here assumed that 34ft (10.36m) is a reasonable average antenna height in amateur installations. See figure 4.

18Mhz. The antenna functions as two full-wave antennas fed in phase; combining the broadside gain of a two-element colinear array with somewhat lower zenith angle radiation than a half-wave dipole due to its long-wire characteristic. See figure 5

21Mhz. On this band the antenna works as a “long-wire” of five half-waves, producing a multilobe polar diagram with very effective low zenith angle radiation. Although a high resistive load is presented to the feeder at the base of the make-up section, the system loads very well when used in conjunction with a suitable antenna tuner and radiates very effectively for dx contacts. See figure 6.

24Mhz. The antenna again functions effectively as a five-half-wave “long-wire” but, because of the shift in the positions of the current anti-nodes on the flat-top and the matching section, as may be seen from figure 7, the matching or “make-up” section now presents a much lower resistive load condition to the feeder connected to its lower end than it does on 21mhz. Again, the polar diagram is multilobed with low zenith angle radiation.

28Mhz. On this band, the antenna functions as two “long-wire” antenna, each of three half-waves, fed in-phase. The polar diagram is similar to that of a three half-wave “long-wire” but with even more gain over a half-wave dipole due to the colinear effect obtained by feeding two three-half-wave antennas, in line and in close proximity, in-phase. See figure 8.

Construction

The Antenna
The dimensions of the antenna and its matching section are shown in Figure 9. The “flat-top” should, if possible, be horizontal and run in a straight line, and should be erected as high as possible above ground. In describing the theory of operation, it has been assumed that it is generally possible to erect the antenna at an average height of about 34ft (10.36m), which happens to be the optimum radiation efficiency on 1.8, 3.5 and 7mhz for any horizontal type antenna, in practice few amateurs can install masts of the optimum height of half a wavelength at 3.5 or 7mhz, and certainly not at 1.8mhz.

If, due to limited space available, or to the shape of the garden, it is not possible to accommodate the 102ft (31.1m) top in a straight line, up to about 10ft (3m) of the antenna wire at each end may be allowed to hang vertically or at some convenient angle, or be bent in a horizontal plane, with little practical effect upon performance. This is because, for any resonant dipole antenna, most of the effective radiation takes place from the centre two-thirds of its length where the current antinodes are situated. Near to each end of such an antenna, the amplitude of the current standing wave falls rapidly to zero at the outer extremities; consequently, the effective radiation from these parts of the antenna is minimal. The antenna may also be used in the form of an inverted-V. However, it should be borne in mind that, for such a configuration to radiate at maximum efficiency, the included angle at the apex of the V should not be less than about 120 degrees. The use of 14awg enameled copper wire is recommended for the flat-top or V, although thinner gauges such as 16 or even 18awg can be used.

The Matching Section
This should be, preferably, of open-wire feeder construction for minimum loss. Since this section always carries a standing-wave of current (and voltage) its actual impedance is unimportant. A typical, and very satisfactory, form of construction is shown in figure 10. The feeder spreaders may be made of any high-grade plastic strips or tubing; the clear plastic tubing sold for beer or wine siphoning is ideal.

If it is desired to use 300 ohm ribbon type feeder for this section, it is strongly recommended that the type with “windows” be used because of its much lower loss than that with solid insulation throughout its length, and its relative freedom from the “detuning” effect caused by rain or snow. If this type of feeder is used for the matching section, allowance must be made for its velocity factor (vf) in calculating the mechanical length required to resonate as a half-wave section electrically at 14.15mhz. Since the vf of standard 300 ohm ribbon feeder is .82, the mechanical length should be 28ft (8.5m). However, if 300 ohm ribbon with “windows” is used, its vf will be almost that of open-wire feeder, say .90, so its mechanical length should be 30.6ft (9.3m). This section should hang vertically from the centre of the antenna for at least 20ft (6.1m) or more if possible. It can then be bent and tied off to a suitable post with a length of nylon or terylene cord so as to be supported at above head-height to the point where, supported by a second post, its lower end is connected to the feeder.

The Feeder
The antenna can be fed by any convenient type of feeder provided always that a suitable type of antenna tuner is used. In the original article describing the G5RV antenna, published in the , then, RSGB bulletin November 1966, it was suggested that if coaxial cable feeder was used, a balun might be employed to provide the necessary unbalanced-to-balanced transformation at the base of the matching section. This was because the antenna and its matching section constitute a balanced system, whereas a coaxial cable is an unbalanced type of feeder. However, later experiments and a better understanding of the theory of operation of the balun indicated that such a device was unsuitable because of the highly reactive load it would “see” at the base of the matching or “make-up” section on most hf bands.

It is now known that if a balun is connected to a reactive load presenting a vswr of more than about 2:1, its internal losses increase, resulting in heating of the windings and saturation of its core (if used). In extreme cases, with relatively high power operation, the heat generated due to the power dissipated in the device can cause it to burn out. However, the main reason for not employing a balun in the case of the G5RV antenna is that, unlike un antenna tuner which employs a tuned circuit, the balun cannot compensate for the reactive load condition presented to it by the antenna on most of the hf bands, whereas a suitable type of antenna tuner can do this most effectively and efficiently.

Recent experiments by the author to determine the importance or otherwise of “unbalance” effects caused by the direct connection of a coaxial feeder to the base of the matching section had a rather surprising result. They proved that, in fact, the hf currents measured at the junction of the inner conductor or the coaxial cable with one side of the (balanced) matching section and at the junction of the outer coaxial conductor (the shield) with the other side of this section are virtually identical on all bands up to 28mhz, where a slight but inconsequential difference in these currents has been observed. There is, therefore, no need to provide an unbalanced-to-balanced device at this junction when using coaxial feeder.

However, the use of an unbalanced-to-unbalanced type of antenna tuner between the coaxial output of a modern transmitter (or transceiver) and the coaxial feeder is essential because of the reactive condition presented at the station end of this feeder which, on all but the 14mhz band, will have a fairly high to high vswr on it. This vswr, however, will result in insignificant losses on a good-quality coaxial feeder of reasonable length; say, up to about 70ft (21.3m). Because it will, inevitably, have standing waves on it, the actual characteristic impedance of the coaxial cable is unimportant, so that either 50 ohm or 80 ohm type can be used.

Another very convenient type of feeder that may be used is 75 ohm twinlead. However, because of the relatively high loss in this type of feeder at frequencies above about 7mhz, especially when it has a high vswr on it, it is recommended that not more than about 50 to 60ft (15.2 to 18.3m) of this type feeder be used between the base of the matching section and the antenna tuner. Unfortunately the 75 ohm twinlead in the UK is the receiver type; the much less lossy transmitter type is available in the USA. By far the most efficient feeder is the “open wire” type. A suitable length of such feeder can be constructed in exactly the same way as that described for the open-wire matching section. If this form of feeder is employed, almost any convenient length may be used from the centre of the antenna right to the antenna tuner (balanced) output terminals. In this case, of course, the matching section becomes an integral part of the feeder.

A particularly convenient length of open-wire feeder is 84ft (25.6m), because such a length permits parallel tuning of the antenna tuner circuit on all bands from 3.5 to 28mhz with conveniently located coil taps in the antenna tuner coils for each band, or, where the alternative form of antenna tuner employing a three-gang 500pf/section variable coupling capacitor is used the optimum loading condition can be achieved for each band. However, this is not a rigid feeder length requirement and almost any length that is mechanically convenient may be used. Since this type of feeder will always carry a standing wave, its characteristic impedance is unimportant, and sharp bends, if necessary, may be used without detriment to its efficiency. It is only when this type of feeder is correctly terminated by a resistive load equal to its characteristic impedance that such bends must be avoided.

Coaxial cable hf choke
Under certain conditions, either due to the inherent “unbalanced-to-balanced” effect caused by the direct connection of a coaxial feeder to the base of the (balanced) matching section, or to pick-up of energy radiated by the antenna, a current may flow on the outside of the coaxial outer conductor. This effect may be considerably reduced, or eliminated, by winding the coaxial cable feeder into a coil of 8 to 10 turns about 6in in diameter immediately below the point of connection of the coaxial cable to the base of the matching section. the turns may be taped together or secured by nylon cord.
It is important, of course, that the junction of the coaxial cable to the matching section be made thoroughly water-proof by any of the accepted methods; binding with several layers of plastic insulating tape or self-amalgamating tape and then applying two or three coats of polyurethane varnish, or totally enclosing the end of the coaxial cable and the connections to the base of the matching section in a sealant such as epoxy resin.

From RADIO COMMUNICATIONS, JULY 1984

Good Operator’s Guide

Good Operators Guide by Riley Hollingsworth FCC

The following hints are a starting point for being a good operator. They have been put together from various statements made by Riley Holingsworth of the FCC during many different presentations he has made.

Please think about them.

You don’t “own” or get preference to use any frequency.

Realize that every right carries responsibilities, and just because you may have a right to do certain things doesn’t mean it’s right to do them in every circumstance.

Give a little ground–even if you have a right not to–in order to help preserve Amateur Radio and not cause it to get a bad name or hasten the day when it becomes obsolete.

Respect band plans, because they make it possible for every mode to have a chance.

Be aware that we all love Amateur Radio, and there’s no need to damage or disgrace it just to save face.

Cut a net or a contester a break, even if you don’t have to and even if you have no interest whatsoever in nets or contesting.

Don’t operate so that whoever hears you becomes sorry they ever got into (or tuned in on) Amateur Radio in the first place.

Keep personal conflicts off the air. Settle your arguments on the telephone, the Internet or in person. Just keep them off the air.

LoTW Experiences – ZL3JT

LOTW__333_X_220
Hello folks
It’s really quite a wonderful thing how Log of the World has developed over the years.
Nearly 10 years ago I joined LotW and on 30 Oct 2003 I uploaded a file of 842 QSOs initially and scored only 3 matches.

On the 24th August 2004 I made my first claim for DXCC endorsements via LotW with 64 “matches”. That claim was # 760 My most recent claim for endorsements for my DXCC was made just last week with another 41 “matches” ..This claim is # 62458

I had gained DXCC HR in Mixed by the traditional QSL card method in November 2002, but joining LotW the following year, (Oct 2003) has seen considerable savings in QSL costs for all my band fillers from my original 330 DXCC mixed.

Some 1670 have been added with LotW and existing QSL cards, more are making my De Soto challenge over 2200 would be cost prohibitive if it wasn’t for LotW.

DXCC HR in phone, CW and DXCC in RTTY have been gained because of LotW.

LotW has some critics, but they pale into insignificance when the benefits of subscribing and using LotW are examined.

73 ZL3JT