Vacuum Variable Antenna Coupler – by Lee Jennings ZL2AL
Dean Straw K6BV provided the inspiration for this antenna tuner in the 21st edition of the ARRL Antenna Book. I have always liked building antenna tuners and must have built 30 over the past 60 years. They are simple electronically and mechanically elegant devices. Dean’s tuner design took no prisoners.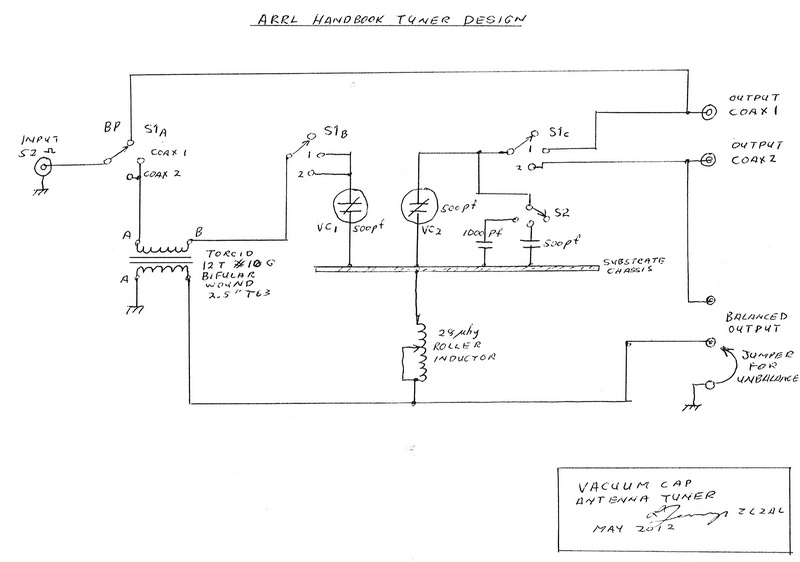
His design placed the balun on the input side so to prevent heat stress and loss rather the one on the output side. Dean’s reasoning was sound and I decided to build one. Large antenna tuners with traditional wide spaced capacitors can build up very high voltages and the minimum capacity becomes an issue on the higher bands. It was constructed very slowly over 18 months with 12 months on the shelf while I thought about solutions to the problems
Antenna tuners of this capacity made by several manufacturers cost well over $1000 and some of their designs and construction are quite minimal. I made the decision to use vacuum variable capacitors and high quality components throughout.
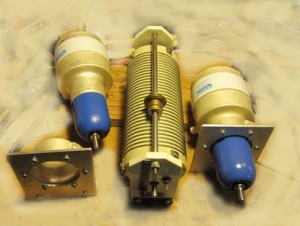
Main Componenets
Alan of MaxGain Systems was offering 500 pF Jennings “seconds” vacuum capacitors at half price as they wouldn’t meet the 12 Kv spec but would stand 6Kv easily. The EF Johnson rotary inductor, large switches and standoff insulators were found at radio flea markets. A friend donated the large turns counter dial. MaxGain Systems was the source for the two matching turns counter dials and I found the Russian fixed capacitors on eBay. Total cost was around $500 USD. Compared with commercial tuners the cost was substantially less and the performance and ratings was much more.
Front Panel Design
Design plays an extremely important role in how we see objects and how they operate ergonomically. We all see some wonderful examples of bad design in the flea markets. We see boxes with different sizes and shaped control knobs placed in bizarre positions on faded and corroded raw aluminum front panels with little or no lettering to identify what the knobs actually do. Little thought has actually gone into the panel layout by the constructor. Perhaps the unit wouldn’t have ended up in the flea markets if he had thought about it before he built it.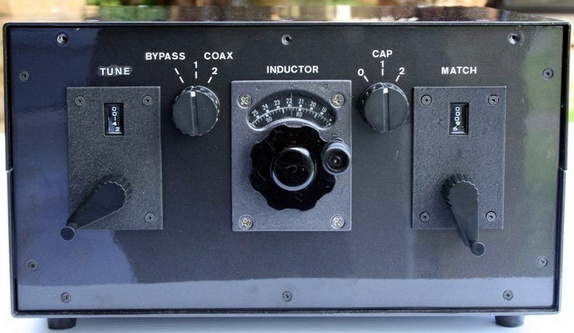
Some considered thinking along with a full size paper sketch or drawing layout working out the problems is easier that hacking away at aluminum and hoping it will work. It usually doesn’t. There are two principles in the design and layout of any homebrew equipment.
1) Balance.This simply means that you strive for placement of a matched set of control knobs equidistant from the edges of the panel in a sort of grid pattern. For example; if the design requires 5 or 7 control knobs then one of the knobs must be in the centre of the horizontal line and the others spaced equally away from the centre one. The same applies for odd numbers. The centre is a space and each knob is spaced from the centre. You can play around on paper until you find the right balance or “look” The idea is simple but vital.
2) Finish. What we see is what stirs us and motivates us to purchase. It is why commercial radio equipment is so successfully marketed. Multi millions of dollars are spent in the design of radios. Finish, colours and the positioning of controls and buttons is vital when it comes to the overall look and feel of the finished unit. The manufacturer has paid attention to the very small details of his design. An amateur home constructor may not be able to duplicate commercial equipment, however, with a little effort you can turn out a nice looking and well functioning unit.
Internal Layout
Once you have determined where your components are situated on a plan view then it is a simple matter to determine how their controls will project from the front panel and at what level. Dean Straw’s design had a sub chassis spaced above the floor of the cabinet which meant that the vacuum variables had to be positioned as close as possible to the sub chassis plate and equally spaced from the side edges. The original main roller inductor’s mounting plates were much too high so new brackets were made to bring the inductor height down. The space between the inductor and either capacitor was small but placing the switches at the height of the turns counter dial plates made the controls look “balanced”
Wiring
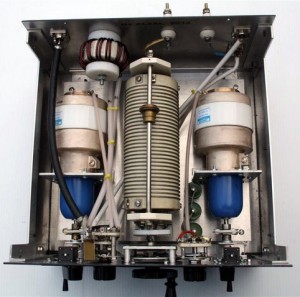
Internal Wiring to Componenets
I didn’t worry about the wiring inside the tuner. Simple RF wiring practices were followed. Extremely high RF voltages exist but the rule was to maintain a 12mm spacing between any component and anything else. RG213 coaxial cable is good for a few kilowatts inside it’s copper sheath braid. I removed the braid and used the inside conductors to connect the components. When an antenna tuner is in operation at a KW there is a lot of RF floating around in the cabinet so maintaining shield integrity became complicated and didn’t seem worth the effort. To date a flashover has never been experienced even with 1.5 Kw into the unit. I did some primitive testing with odd loads by attempting resonate a 30M loop with 7.1 Mhz and 3.5 Mhz RF. My MFJ RF Analyzer showed some rather very high and very low impedances at those frequencies but the antenna coupler took care of the match nicely. The true test of its abilities is attempting to resonate a 40M dipole on 1.8 Mhz. It did the match OK but I would sure the efficiency would be very poor. The antenna tuner passed its “real world” testing without any component failures.
The original design had a separate inductor for 10m. The reason was that the original air spaced capacitors had a high minimum capacitance which resulted in very few turns on the roller inductor at resonance. I was prepared to add one in if necessary but the 5 Pfd minimum capacitance of the capacitor resulted in resonance on 24 and 28 Mhz with several turns left on the inductor. The SWR measurements into a dummy load showed 1 to 1 SWR on those bands.
Construction
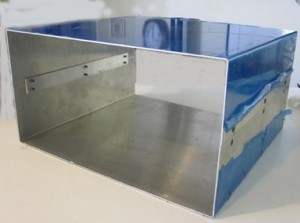
Lower and Upper Cabinet Shells
To construct a metal cabinet is not all that difficult. You do need some metal working tools. A small cheap drill press, cheap 4” angle grinder with 1.0mm thin disc and a good quality cordless drill is invaluable. Hand tools include metal set square, scriber, 2 foot S/S rule, a pair of small “C” clamps and a set of good quality sharp HSS drill bits. If you want to use the counter sunk screws, a counter sink bit, 3mm tap and 4mm tap is required.
Once you have determined the size of cabinet for your project, it would be worthwhile to have the top and bottom shells (3mm thick aluminium) cut to size and folded in a sheet metal shop. The cost is minimal, it will be perfectly cut and folded square. The rest is fairly easy. The top and bottom shells are secured on their sides with 30 x 3mm flat. I simply clamped one on the lower shell. Drill and tapped the holes, put in the screws and then added the top shell and repeated the same operation. Everthing lines up perfectly.
If you choose not to tap the inside plates and angle, you can use nuts and lockwashers to secure them. The uprights are 20 x 20 x 3mm alloy angle as are the top and bottom angles to secure the front panels. Once the basic shell is made, you can measure the exact size of the front and rear panels and have your local sheet metal shop cut them with a metal shear from 3mm sheet aluminum. Drill and tap the front and back panels and the cabinet is complete.
One good source of commercial surplus cabinets are the HP line of test equipment manufactured in the 1960s. They all had that same look and feel with the brushed alloy handles on each side and may still be found on the surplus markets or in flea markets for next to nothing. The cabinets however, when stripped of components are excellent for Linear amplifiers, power supplies and large antenna tuners. It is well worth while hunting down the right cabinet for your project and rebuilding with a new front panel.
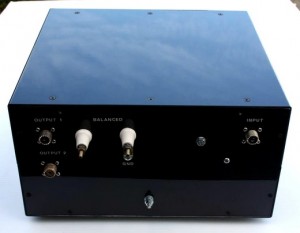
Back Panel Layout
The back panel was laid out to match the switches and wiring from the front panel. Placement of the SO-239 sockets and feed through insulators are not critical. Although my back panel is not balanced, the sockets are placed in a horizontal line that your eye sees first. The two outside coax sockets are equidistant from the edge of the sides. The feed through insulators and the 25mm standoff insulators that support the sub chassis were all picked up from a flea market for a few cents each. And yes, I washed them in detergent and cleaned them of 70 years grime before installation!
Winding the Toroid
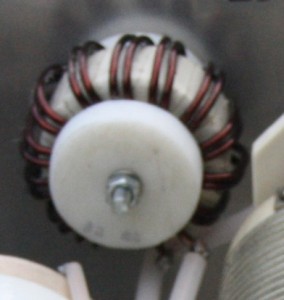
Toroid Details
The ferrite toroid is about 65 or 70 mm in diameter and 25 mm thick. The exact dimensions are not all that critical as long as the mix is acceptable for 1.5 to 30 Mhz. Amidon will have one. There seems to be a lot of mystique about winding a toroid. Before any winding on the form takes place you should wrap the form in two layers of fiberglass tape to prevent the edges of the toroid digging into the wire insulation.
In practice the winding is fairly basic with two parallel windings of 14 turns of #12 gauge Formvar insulated copper wire. After estimating that each of the two lengths of wire would be about 1.3 metre, I put two nails in each end of a long board close together. I wound the ends on the nails which gave me two tensioned wires touching the length of the board. A hot melt glue gun was used to bond the wires together every 50 or 60 mm. I then cut the ends of the wires off the nails, passed the wire pair through the toroid to the centre of the wires and then wound each pair end on 7 turns and adjusted for even spacing around the toroid. An old white nylon kitchen cutting board which I cut up and use for antenna insulators was used for the toroid end disks. I used a 50mm hole saw and cut two disks, one for each side of the toroid assembly. The hole saw leaves a neat 6mm hole in the centre of each disk. Both disks and the toroid assembly are secured with a 6mm bolt, lockwasher and nut to hold it in place on the inside back panel. The four ends of the toroid wires were cleaned and tinned before mounting so that it was easy to solder on the connecting wires.
Finish

The recessed smooth look of the countersunk Unbrako screws – front panel 3mm screws not installed showing the countersinking
Much depends on what we see in front of us and what the final use is. The surface of the panels are prepared with 400 grit wet and dry sandpaper, then cleaned with a solvent and finally sprayed with an aerosol can of your favorite colour on top of an undercoat spray. A good idea is to heat to panels in a kitchen oven to around 35C. Then the aerosol spray will adhere and dry perfectly very quickly. After spray, place the panels back in the oven and turn the oven off and leave it to cool down for a hour or so. The baked on finish will look very good indeed. Frankly, I find it easier to choose the perfect colour from the vast array of colours from the automotive industry and take it to my local car painter who will spray it professionally at a minimal cost. Finishing homebrew equipment involves the building and testing to your satisfaction and then completely disassembling the unit and masking before spraying. It is tedious but worth the effort.
Finish also means paying attention to the very small details. Assorted mismatched screws from your junk box really won’t do you any favors with the look of your project. A matched set of screws, either pan head or countersunk Unbracko, Philips or Posidrive will give your cabinet that professionally finished look.
The one final detail is the lettering of the control functions. The first choice is preparing the labels on a computer and printing them on transparent sticky labels. This approach only works if the panel is finished in a light colour so that dark or black lettering will be readable. Unfortunately inkjet printers cannot print labels in white to contrast with black or dark gray panel finishes.
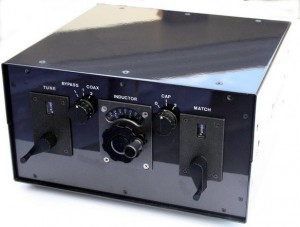
Lettering Finishes the Project Professionally
My choice was to use “Letraset” rub on lettering transfers as I wanted a very dark gray cabinet and front panel. Although difficult to place in position correctly, they do a great job. The letters will rub off again with use unless sealed. Many have tried sealing with a clear plastic spray. Unfortunately the letters will dissolve and your hard work will be ruined. The answer is a very fine artist’s brush and a thin coat of polyurethane varnish which doesn’t react with the lettering. The finished result will add to the project functionality and look.
Summary
The finished design has turned out very well. Hindsight is a wonderful thing but I would have increased the width of cabinet by another 40mm. The reason is purely aesthetic as that would give me another 20mm spacing between each of the turns counter dials so that the switch knobs would look more prominent. The Letraset that I used was 4mm in height. Perhaps I would have used 3mm letters if they were available in white. They are minor changes but would have improved the final design appearance. Paying attention to detail is what home construction is all about.
Thanks to Dean Straw, K6BV for the electrical elegance of his circuitry. This antenna tuner works beautifully and looks great in my shack.
73, Lee, ZL2AL


